Advanced Studio Lighting
I recently attended the Advanced Studio Lighting course run by the London Photographic Meetup Group. It was held at the Tabernacle in London and was a three hour course with one model and six photographers. It was a great learning experience for me, because the approach was a mixture of practical and theory. We were shown the effects that we needed to achieve, and then worked in a group, with guidance to set-up the lighting to match.
On a general note for shooting in a studio, you should set camera settings to where ambient light is 0, so only the studio lighting is being meaningfully recorded.
Gritty Realism
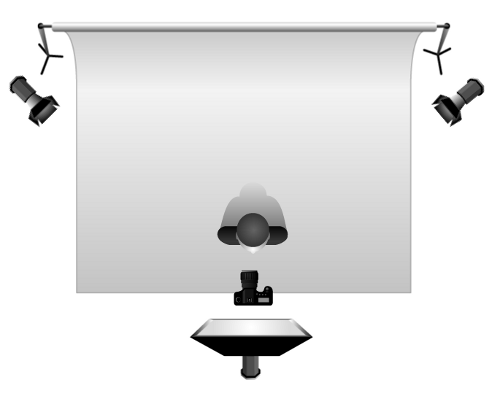
Gritty Realism Setup
This is a common lighting set-up for sports stars and other often masculine poses. A single soft-box gives definition to the face, and two barn door lights put bright light and harsh shadows on the subject.
Due to the nature of the shot, you can send in front of soft box. If you can't even out the back lights, turn off the main light so you only see them.
My only issue with this approach is that catchlights are not easily visible in the subjects eyes, though a well placed reflector can address this to a degree, as can making sure the subjects brow is not blocking the light coming down.

Rembrandt Lighting

Rembrandt Lighting Setup
Named for the famous painter, who worked in a studio with a skylight 45 degrees to the side and above the subject. The key aim for Rembrandt lighting is to achieve a triangle of light on the cheek furthers from the key light. It is achieved with a soft box(for soft shadows) or more direct light (for harsher) at 45 degrees to the subject and ideally, above them pointing down. A second light with snoot or barn door is used on a very low setting to set the darkest point on the face. A hair light is often useful to separate out the background.
Start with the darkest light, this will define the depth of your shadows. The lower the power, the darker the shadow and the less the detail.
You are aiming for a triangle of light next to the nose and below the eye, if the light is not high enough, the shadow will go sideways not down on the models face and you won't have the triangle.
Product Placement

Product Placement Setup
This works best with very focused lighting. We used two snoots, one high up, aimed down, and targeting the models face. A second lower, aimed at the product the model is holding. A third barn door light was used at the back to add a splash of colour to the background an pull it out.
For this, you should use a gridded snoot because it will splash light on very specific areas.
Light the model and the product separately with two snoots, to bring the face and the item out, but, by having a great deal of shadow, draw attention to the areas you intend.
In terms of the rear light, this could have been done with a white wall and gel if a colour backdrop is unavailable.
